Author: Abhishek Gandhi

Chai theme by Hitesh Choudhary

Hitesh Choudhary, a popular coding instructor, has developed the “Chai theme” for Visual Studio Code. This theme is designed with teaching in mind, making it friendly for coding and programming instructors. It features strong contrast, making it useful for presenting material to students. The theme has received positive feedback on social media platforms like Twitter and LinkedIn, with users praising its visibility and suitability for recording coding videos. According to Hitesh, it took him around a year to analyze all the issues and finally publish it. The theme has two versions, Dark Chai and Light Chai, and each language token is customized. The Dark Chai version is best for recording videos, highlights your active tab, and is suitable for each language token. The Light Chai version is for those who love working with a light theme. If you are interested in trying out this theme, you can find it on Hitesh Choudhary’s below URLs.

VsCode theme Link: https://marketplace.visualstudio.com/items?itemName=hiteshchoudharycode.chai-theme

Git Hub Chai theme Link: https://github.com/hiteshchoudhary/vscode-theme

I have tried and below is a sample example of how it looks like with a dark chai theme

Happy Coding

How to increase your knowledge as Laravel Developer.

How to in crease your knowledge as Laravel Developer.

As a PHP Laravel developer, you can improve your knowledge and skills by addressing common challenges and learning from the Laravel community.

Here are some suggestions to help you enhance your expertise:

1. Addressing Technical Vulnerabilities: Laravel comes equipped with a shield against major security vulnerabilities, such as cross-site scripting and SQL injection. Familiarize yourself with these vulnerabilities and learn how Laravel helps you avoid them.

2. Error and Exception Handling: Laravel already has error and exception handling configured for you. Study the `App\Exceptions\Handler` class and learn how to customize it to better handle exceptions and errors.

3. Debugging and Fixing Code Issues: As a Laravel developer, you’ll frequently fix issues logged by users, other developers, and management. Learn how to locate and diagnose these problems, and create solutions to resolve them.

4. Performing UI Testing: Laravel developers conduct user-interface testing when launching new applications or redesigning old ones. Learn how to perform UI testing and ensure your applications are user-friendly.

5. Engaging with the Laravel Community: Participate in Laravel forums, such as The Laracasts forums and Laravel.io, to learn from other developers, share your knowledge, and build your problem-solving skills.

6. Avoiding Common Mistakes: Be aware of common mistakes that PHP developers make, such as ignoring Unicode/UTF-8 issues and leaving dangling array references after foreach loops. Learn how to avoid these mistakes and improve your code quality.

By focusing on these areas, you can expand your knowledge and skills as a Laravel developer, ensuring a successful career in web development.

Happy Coding.

Upcoming News


Hey Guys thankyou for your love and support. finally after 3 years we will come soon with new blogs on web development on this website. stay Tuned.

Thanks,
Abhishek Gandhi.

Authentication with google drive using python

Authentication in Google Drive API With Python

Here we are going to see the Implementation of Google Drive API with Python(this blog is the next part of the last blog named How to use Google Drive API with Python).

In this series, we are going to implement different types of function which is used for communicating with google drive.

If you are new to this blog then please visit Part 1 Click here

In today’s blog, we are going to implement Google Authentication using Python.

Note:

  • If you followed from the last blog then please remove quickstart.py and token.pikle file because we already implemented authentication in that with read-only mode. but now we are going to implement it with all permissions.
  • Here I created program.py as the main file which calls all functions and googleDriveFunction.py for writing functions that communicate with google drive.
Step 1: Create a new file named program.py (from where we call all functions and run this file).
Step 2:  Create a new file named googleDriveFunction.py (where we can write all functions).

Step 3: Import blow showed library at the beginning of googleDriveFUnction.py and program.py  file.

from __future__ import print_function
import pickle
import os.path
from googleapiclient.discovery import build
from google_auth_oauthlib.flow import InstalledAppFlow
from google.auth.transport.requests import Request
Step 4: Type scope as below shown in googleDriveFunction.py file.
SCOPES = [‘https://www.googleapis.com/auth/drive’]
Note: above scope maintains access permissions.
Step 4: import googleDriveFunction into program.py file(you can import it below the google drive libraries in program.py).
import googleDriveFunction
Step 5: Create an authentication function in googleDriveFunction.py file as shown below.
def authentication():
    creds = None
    # The file token.pickle stores the user’s access and refresh tokens, and is
    # created automatically when the authorization flow completes for the first
    # time.
    if os.path.exists(‘token.pickle’):
        with open(‘token.pickle’, ‘rb’) as token:
            creds = pickle.load(token)
    # If there are no (valid) credentials available, let the user log in.
    if not creds or not creds.valid:
        if creds and creds.expired and creds.refresh_token:
            creds.refresh(Request())
        else:
            flow = InstalledAppFlow.from_client_secrets_file(
                ‘credentials.json’, SCOPES)
            creds = flow.run_local_server(port=0)
        # Save the credentials for the next run
        with open(‘token.pickle’, ‘wb’) as token:
            pickle.dump(creds, token)
    return creds
Step 6: Write below code in program.py file.
#declaretion of main function
def main():
    #calling authentication function and store credentials.
    credentials = googleDriveFunction.authentication()
    #print credentials.
    print(credentials)
if __name__ == ‘__main__’:
    #calling main function.
    main()
Step 7: then run program.py file and you can get link on cmd like below screenshot and link automatically opened in default browser.
op1
Note:
  • If Not redirected in the browser then copy the link from the terminal(cmd) and past it into the browser and press enter.
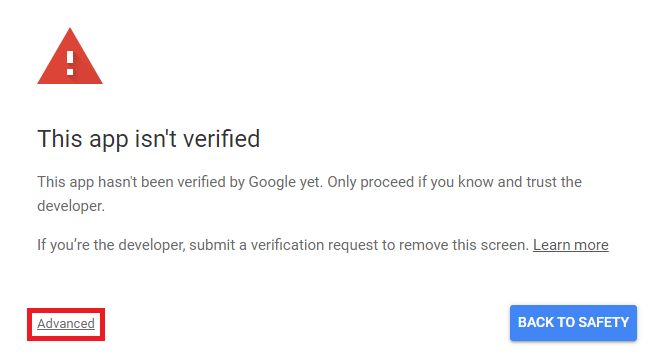
  • In the browser, if you have multiple accounts logged in then select one account. then if you get an error like the below screenshot.
err1
  • Then click on the Advanced link as shown in screenshot.


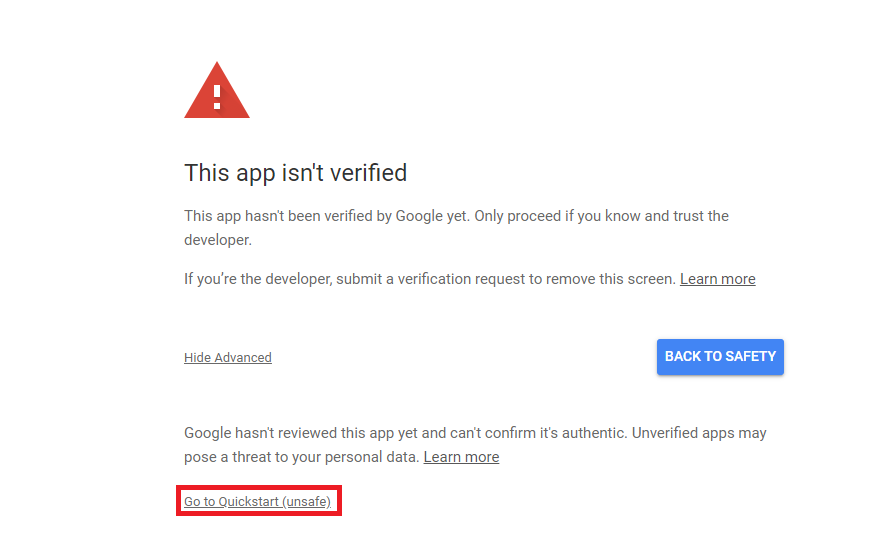
  • then click on link shown in below screenshot

err2

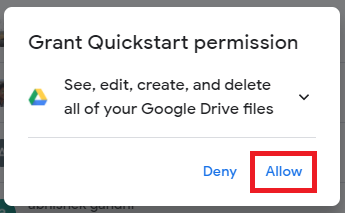
  • Next, allow permission to access the drive as shown in the below screenshot.

permission

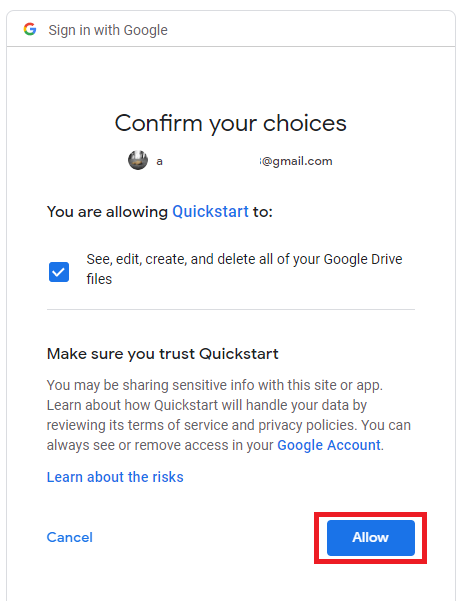
  • One more time confirm and allow permission as shown below screenshot.

confirm allow

  • Next, you will see this message in the browser and in cmd(terminal) which means your authentication is successful.

successcmd success

Step 9: Create service using credentials

  • In the program.py file, we stored credentials which is the output of the authentication function.
  • use it for creating service. Write the below code in the program.py file.
    # create service
    service = build(‘drive’, ‘v3’, credentials=credentials)
  • if you get output like below then service is build successfully.

service success

How to install WordPress on local computer

Step 1: Download WordPress from link
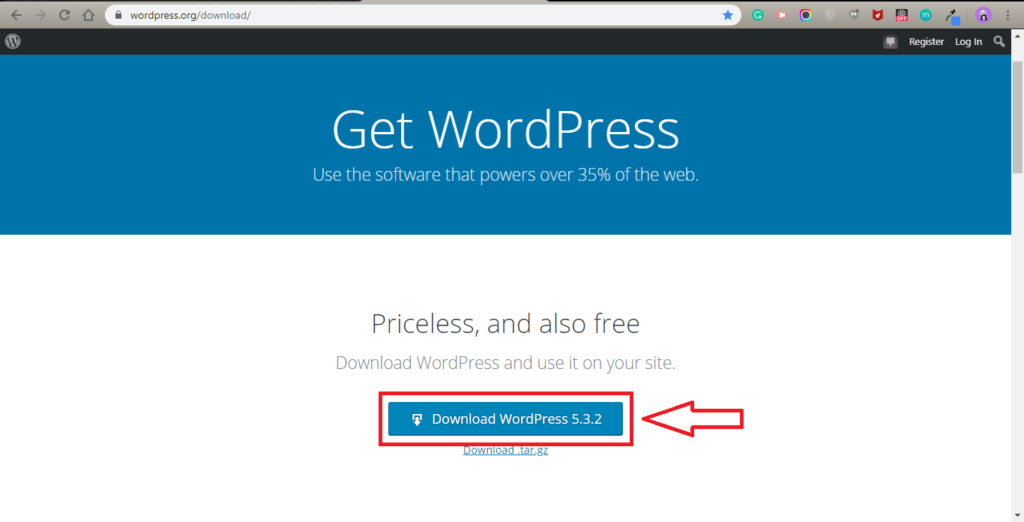
Download Setup

Note: In my case latest version is 5.3.2 but it maybe different in your case while you are installing WordPress.

Step 2: Copy Zip file to htdocs folder(if you are using xampp) or to www folder(if you are using wamp).

Step 3: Extract files from Zip file.

Step 4: Open Xampp and start Apache server and MySQL.

Note: If you are using wamp then start apache and MYSQL according to that.

Step 4: Go to PHPMyAdmin in the localhost using a browser.

Step 5: Create a new database (Write the name of Database and Click on Create button).

create database

Step 6: Go where you extracted the WordPress ZIP file.

Step 7: Move wordpress Folder from wordpress-5.3.2 folder and rename wordpress folder with appropriate name. (I am giving name trainingblog)

Note: Currently Latest version is 5.3.2 but in your case version may be different.

Step 8: open renamed folder in my case named with trainingblog and read readme.html file.

Note: Readme.html guide you for how to install WordPress.

Step 9: Next run wp-admin/install.php in my case localhost/training/trainingblog/wp-admin/install.php

on the browser and make sure before running install.php apache and MySQL is running.

Note: When you run install.php it will start the installation from setup-config.php file.

Step 10: Click your language in which you wanted to install WordPress and Select on the Continue button.

Step 11: In the next page Read the instruction and click on let’s go! button.
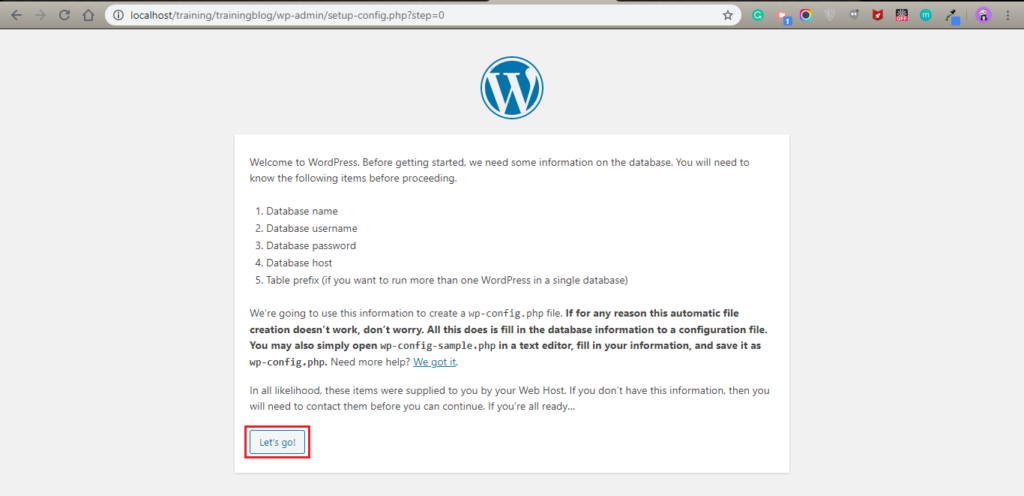
Step 12: On the next page fill some information such as Database Name, User Name, Password, Database Host and Table Prefix.

Note: Give database name which database we created earlier, give your user name most of the case it is “root” If you already set any password then only give a password or leave it blank, database host is localhost and if want to set Table prefix set it here.

Step 13: Click on Run the installation button as shown in the below screenshot.

Step 14: Fill the information on the next page such as Site Title, User name, Password, email and click on install WordPress button as shown in the below screenshot.

Step 15: If you get a Success message as shown in the below screenshot then blog is installation is completed.

Note: If you want to check that blog is installed or not then click on the login button it will redirect you to the login page and try to login with username and password.

After login, if you see a dashboard like below then the blog is installed.

If you have any questions or queries please comment down below in the comment section.

Thanks for reading this blog and stay tuned for more blogs.

WebXIntegrators.